


Protecting a Web API from unauthorized users is the first step to get control over who can access it. However, simply excluding anonymous users may be insufficient in some situations. You may need to control over who can do what on your application. This article will show you how to define and check permissions for users accessing your ASP.NET Web API secured with Auth0.
The Need for Permissions
A previous article introduced how to enable authorization for ASP.NET Web APIs. The sample application accompanying that article is an ASP.NET Web API that implements the CRUD (Create, Retrieve, Update, Delete) operations over a glossary of terms. That article explains how to protect the Web API by using Auth0 so that only authorized users can create, modify, and delete glossary items. Everyone can still get the list of terms or a single glossary item.
That worked pretty well! However, you may need more granular control over the users who can do specific operations. For example, you may want to give some users the ability to add a new glossary term or modify an existing one, but you don't want them to delete items. Only specific users should be able also to delete items. To achieve this control level, you must deal with permissions.
In the security context, a permission is a property of a resource that indicates the operation a user can do on it, like, for example, read, write, print, send, etc. In the case of your sample application, you have the glossary and term resources. Regarding the former, you can get the list of terms and add new items. Regarding the latter, you can read, update, or delete it.
Permissions vs. privileges
Usually, permissions and privileges are used interchangeably, but technically they have precise and different meanings in the context of computer security.
A permission is an action that can be performed on a resource. It is somehow bounded to the resource, and you can consider it as a resource property.
A privilege is a permission assigned to a user or an application. When you assign the writing permission to a user, you are granting them a privilege.
Setting up the Web API Application
The goal of this article is to show you how to implement permission-based authorization in this sample application.
Make sure you have the latest .NET SDK already installed on your machine to run the sample ASP.NET application.
So, let's start by downloading the source code with the following command:
git clone --branch add-authorization --single-branch https://github.com/auth0-blog/glossary-web-api-aspnet.gitOnce you download the application, register it with Auth0 in order to enable support for the authorization service. If you haven't an Auth0 account, you can sign up for a free one. Follow the instructions in this article to register the application with Auth0.
After you completed the registration, move to the glossary-web-api-aspnet folder and open the appsettings.json configuration file. Its content looks as follows:
{
  "Logging": {
    "LogLevel": {
      "Default": "Information",
      "Microsoft": "Warning",
      "Microsoft.Hosting.Lifetime": "Information"
    }
  },
  "AllowedHosts": "*",
  "Auth0": {
    "Domain": "YOUR_AUTH0_DOMAIN",
    "Audience": "YOUR_UNIQUE_IDENTIFIER"
  }
}
Replace the YOUR_AUTH0_DOMAIN placeholder with your Auth0 domain and the YOUR_UNIQUE_IDENTIFIER placeholder with the value you provided as a unique identifier of your API (https://glossary.com, if you kept the value suggested in the mentioned article).
Note: Your Auth0 domain is a string in the form
YOUR-TENANT-NAME.auth0.comwhereYOUR-TENANT-NAMEis the name you provided when you created your account with Auth0. For more information, check the documentation.
Now, launch the ASP.NET Web API application by typing dotnet run in a terminal window. By pointing your browser to https://localhost:5001/swagger, you should see the Swagger UI shown below to test the API interactively:

To call the POST, PUT, and DELETE actions, you need an access token, as explained in this section.
Now you are ready to set up permissions on your Web API.
Defining Permissions for an API
The first step is to define the permissions for your application. These permissions can vary depending on the needs of your application. In the glossary Web API application, we are going to define the permissions identified by the following strings:
create:term. This permission allows you to add a new term to the glossary.update:term. With this permission, you can update an existing term.delete:term. This permission allows you to delete a term from the glossary.
To associate these permissions with your API, go to the API section of your Auth0 Dashboard and select the API you defined for the glossary application. Then select the Permissions tab. Here you can add the permissions with their descriptions as defined above. At the end of this process, that page will look like the following:
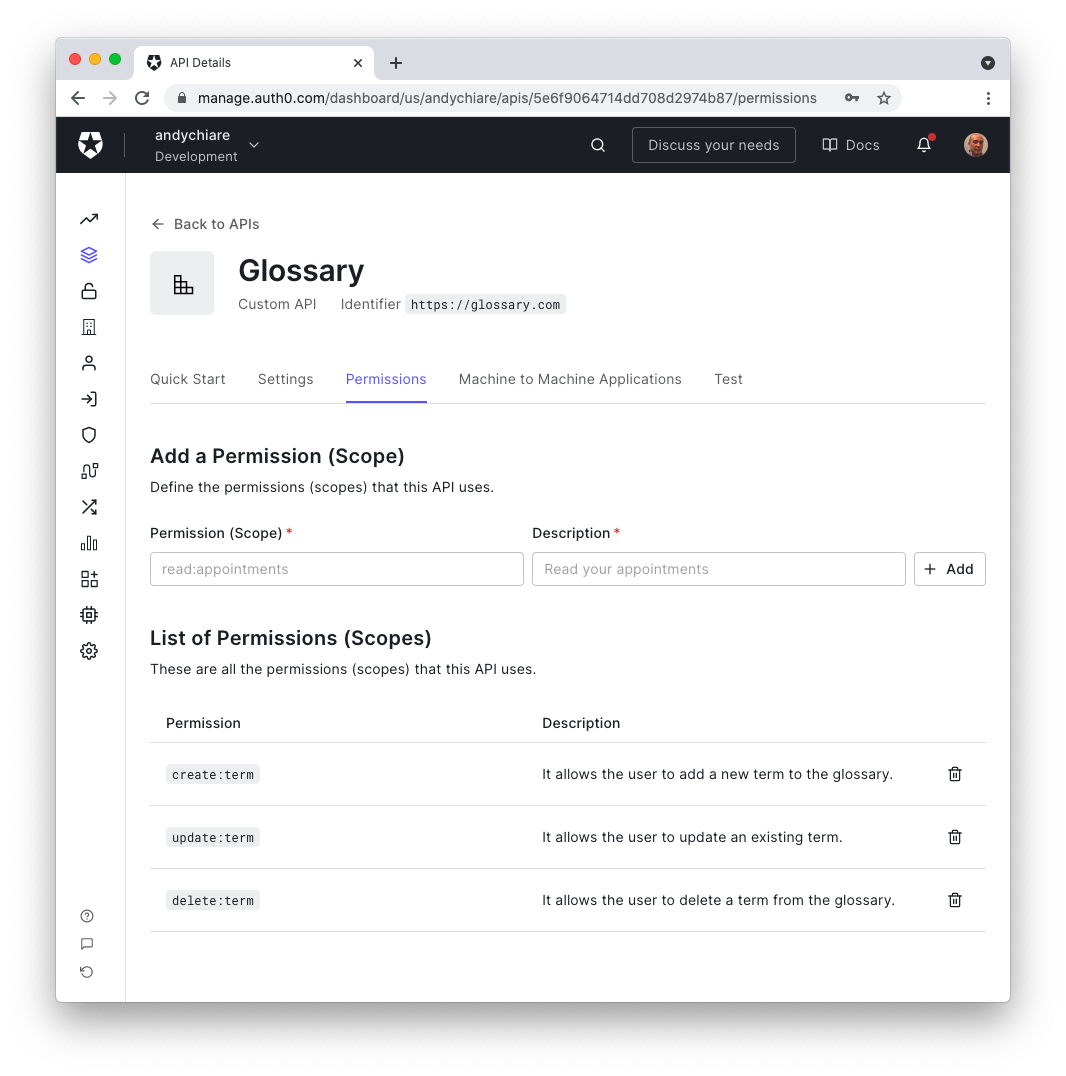
This configuration informs Auth0 that the glossary Web API supports only these permissions.
Next, move to the Settings tab and scroll down to the RBAC Settings section. Here, click both the Enable RBAC and the Add Permissions in the Access Token toggle buttons, as in the following picture, and don't forget to click the Save button at the end:
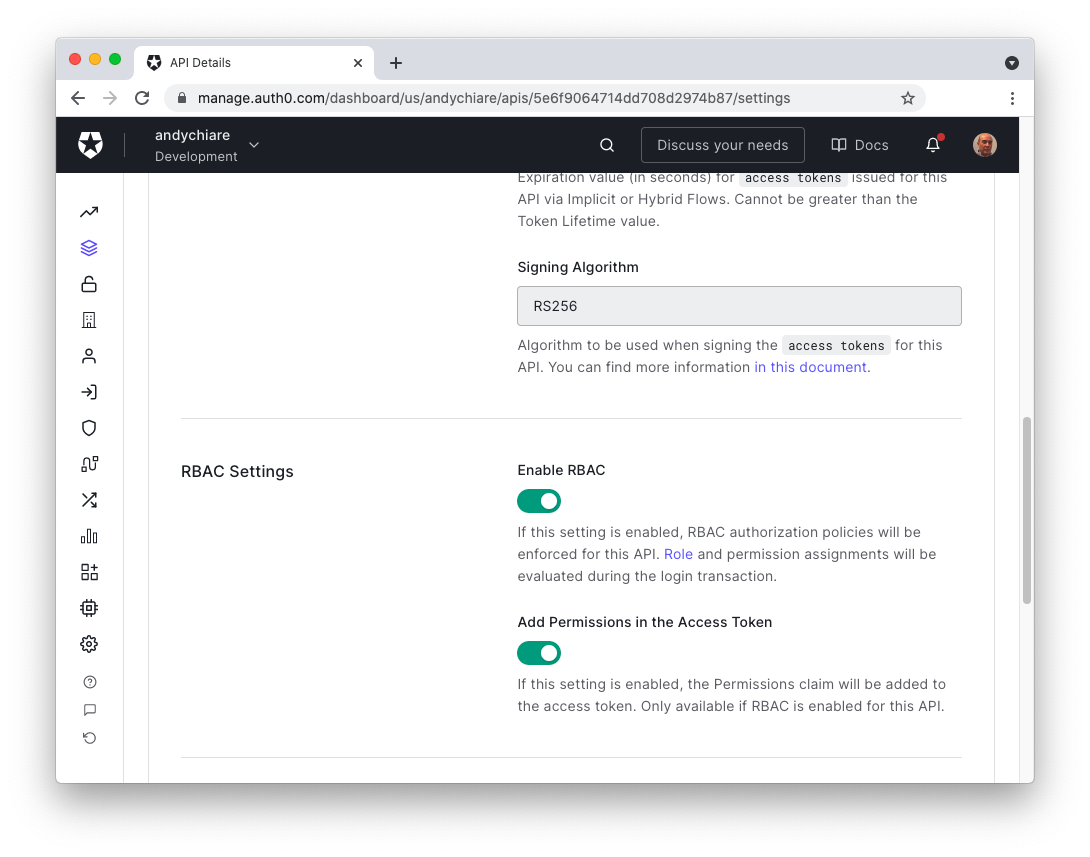
These settings will enforce the evaluation of roles and permissions assignments during the user login.
Although we will not use roles in this article, you still need to enable RBAC (Role-Based Access Control) support.
Permissions vs. scopes
When defining the API permissions in the Auth0 Dashboard, you find the term scope next to the term permission. You may think that they are synonymous, but they actually aren't. Both describe the actions that can be performed on a resource, but they are used in different authorization scenarios.
Permissions are used in a first-party authorization scenario, i.e., when the same organization or person controls both the client and the server applications.
Scopes are used in a third-party authorization scenario, i.e., when different organizations control the client and the server applications.
In the latter scenario, the client application asks for one or more permissions to operate on a specific resource on behalf of the user. This requested permission is a scope. Usually, scopes limit what an app can do on behalf of the user, and the user may grant them to the application or not.
Scopes have been introduced by OAuth 2.0 in the context of delegated authorization.
Checking Permissions in an API
As the next step, you need to check that the user calling your API has the proper permissions. You can accomplish this task by defining one or more authorization policies and applying them to the controller or the methods that implement your ASP.NET Web API.
An authorization policy is a set of requirements that users or applications must meet in order to be allowed to perform an action on a resource. Let's see how you can define and apply an authorization policy in practice.
Registering an authorization policy
To define an authorization policy for the glossary Web API, open the Startup.cs file in the root folder of the project and append the following code to the body of the ConfigureServices() method:
// Startup.cs

// ...existing code...

namespace Glossary
{
  public class Startup
  {
    // ...existing code...

    public void ConfigureServices(IServiceCollection services)
    {
      // ...existing code...

      //👇 new code
      services.AddAuthorization(options =>
      {
        options.AddPolicy("WriteAccess", policy =>
                          policy.RequireClaim("permissions", "create:term", "update:term"));
        options.AddPolicy("DeleteAccess", policy =>
                          policy.RequireClaim("permissions", "delete:term"));
      });
      //👆 new code
    }

    // ...existing code...
  }
}
You invoked the AddAuthorization() method to configure the ASP.NET authorization service. To this purpose, you defined two authorization policies via the AddPolicy() method of the options parameter. Each policy has a name and a lambda expression. For example, the WriteAccess authorization policy is defined by requiring the permissions claim in the access token whose value can be create:term or update:term. Similarly, for the DeleteAccess policy.
Authorization policy approaches
You defined two authorization policies based on the permissions you defined for the API in the Auth0 Dashboard. Both policies are based on requiring the existence of claims with specific values. This is the simplest way to define an authorization policy in ASP.NET. It is usually referred to as claim-based authorization.
If you have more complex criteria for defining your authorization policies, you need to use the policy-based authorization approach. For example, if you want to be sure that the issuer of the permissions claim is your Auth0 tenant, you can define your WriteAccess authorization policy as follows:
options.AddPolicy("WriteAccess", policy =>
                    policy.RequireAssertion(context =>
                       context.User.HasClaim(claim =>
                         (claim.Type == "permissions" &&
                          (claim.Value == "create:term" ||
                           claim.Value == "update:term") &&
                          claim.Issuer == $"https://{Configuration["Auth0:Domain"]}/"
                         )
                       )
                    )
                  );
In this case, you used the RequireAssertion() method to build a boolean expression that evaluates your specific criteria. In particular, this criteria checks that the Issuer property of the claim matches the URL of your Auth0 tenant.
Note that claim-based authorization is just a specialized case of policy-based authorization.
If you have more specific needs, you can even customize the built-in ASP.NET authorization middleware.
Applying an authorization policy
Once you define and register your authorization policies, you can apply them in your Web API. Applying an authorization policy is just a matter of passing parameters to the Authorize attribute. So, open the GlossaryController.cs file under the Controllers folder and apply the changes outlined in the following:
// Controllers/GlossaryController.cs

// ...existing code...

namespace Glossary.Controllers
{
  [ApiController]
  [Route("api/[controller]")]
  public class GlossaryController : ControllerBase
  {
    // ...existing code...

    [HttpPost]
    [Authorize(Policy = "WriteAccess")]    //👈 changed code
    public ActionResult Post(GlossaryItem glossaryItem)
    {
      // ...existing code...
    }

    [HttpPut]
    [Authorize(Policy = "WriteAccess")]    //👈 changed code
    public ActionResult Put(GlossaryItem glossaryItem)
    {
      // ...existing code...
    }

    [HttpDelete]
    [Route("{term}")]
    [Authorize(Policy = "DeleteAccess")]    //👈 changed code
    public ActionResult Delete(string term)
    {
      // ...existing code...
    }
  }
}
This way, you are requesting the ASP.NET authorization middleware to evaluate a specific policy to authorize the execution of the related controller's method.
Your Web API is ready to run and check permissions!
Testing Permissions
To test the new glossary Web API, you are going to simulate users accessing the endpoints with different permissions. For this simulation, you will interact with the API through the Swagger UI by providing an access token. So, launch the Web API by typing dotnet run in a terminal window and point your browser to https://localhost:5001/swagger.
Testing access without permissions
Let's try to access a protected endpoint with an access token not bound to any permissions. Go to the API section of your Auth0 Dashboard, select the API related to the glossary app, and select the Test tab. Here you can get a token to test your Web API by clicking the Copy Token icon as shown in the following picture:

Now, head back to your browser and click the Authorize button. A window dialog opens, as shown in the following picture:
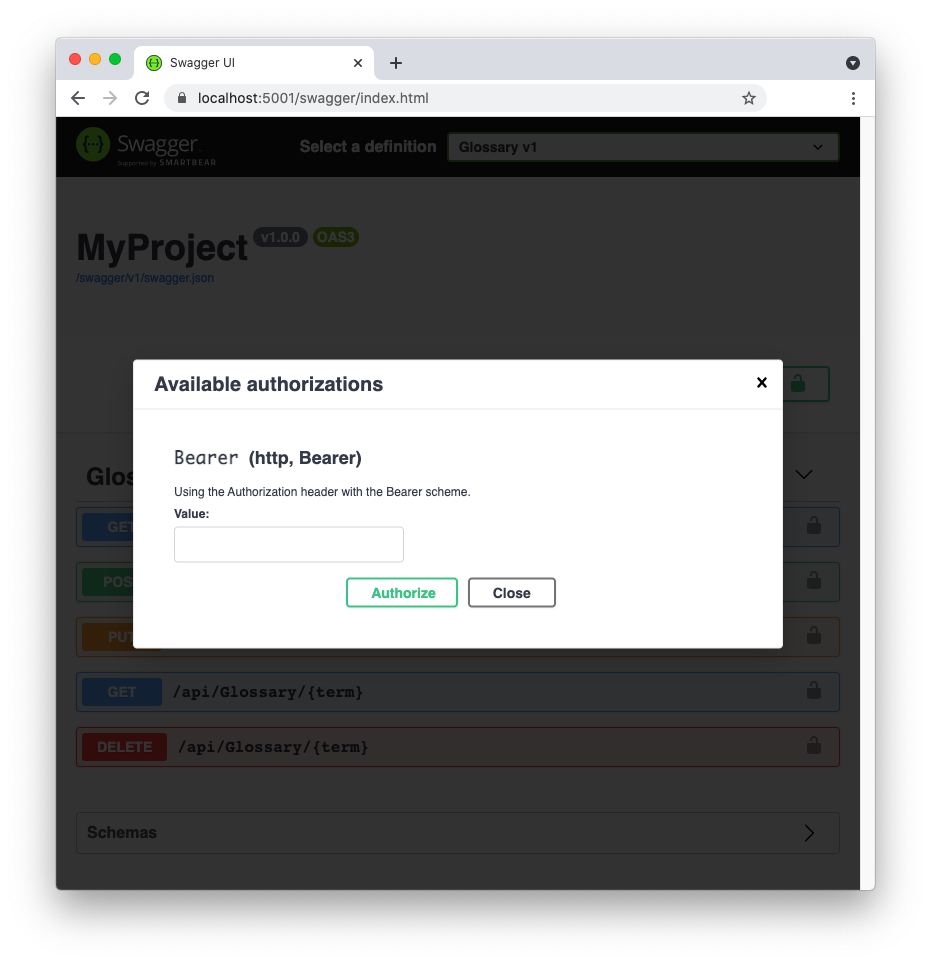
Paste the token you copied from the Auth0 Dashboard into the text box and click Authorize.
To learn a bit more about the Swagger UI, check out this article about ASP.NET Web API authorization.
Now, try to add a new glossary term through the POST action. You should get a negative response from the server similar to this one:
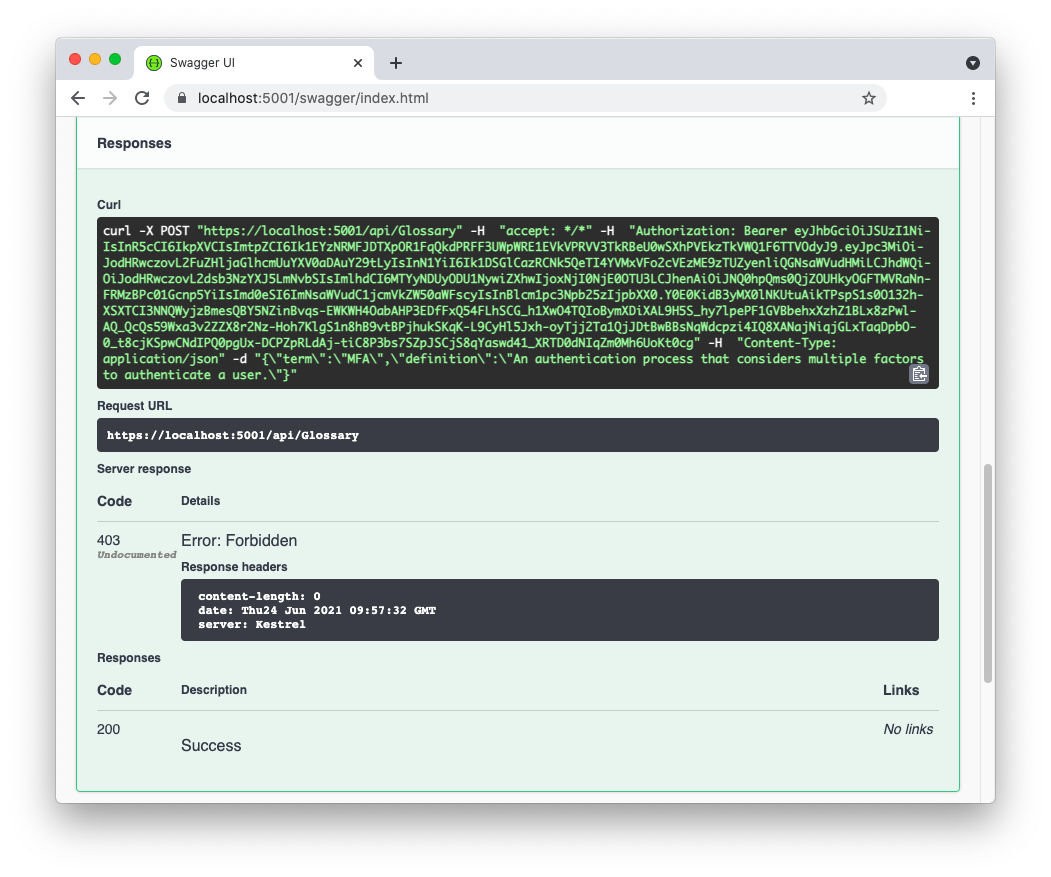
Notice that, this time, you didn't receive the 401 Unauthorized HTTP status code. You received the 403 Forbidden status code. This denotes that you are providing an access token, so you are authorized to access the application, but you don't have the required permissions to perform this specific action.
You can verify your current permissions by visiting jwt.io and pasting your access token there. This tool allows you to decode your access token. You will discover that the permissions claim shown in the payload section is an empty array, as in the following picture:

Testing access with writing permissions
Let's create an access token with the required permissions for adding a new term.
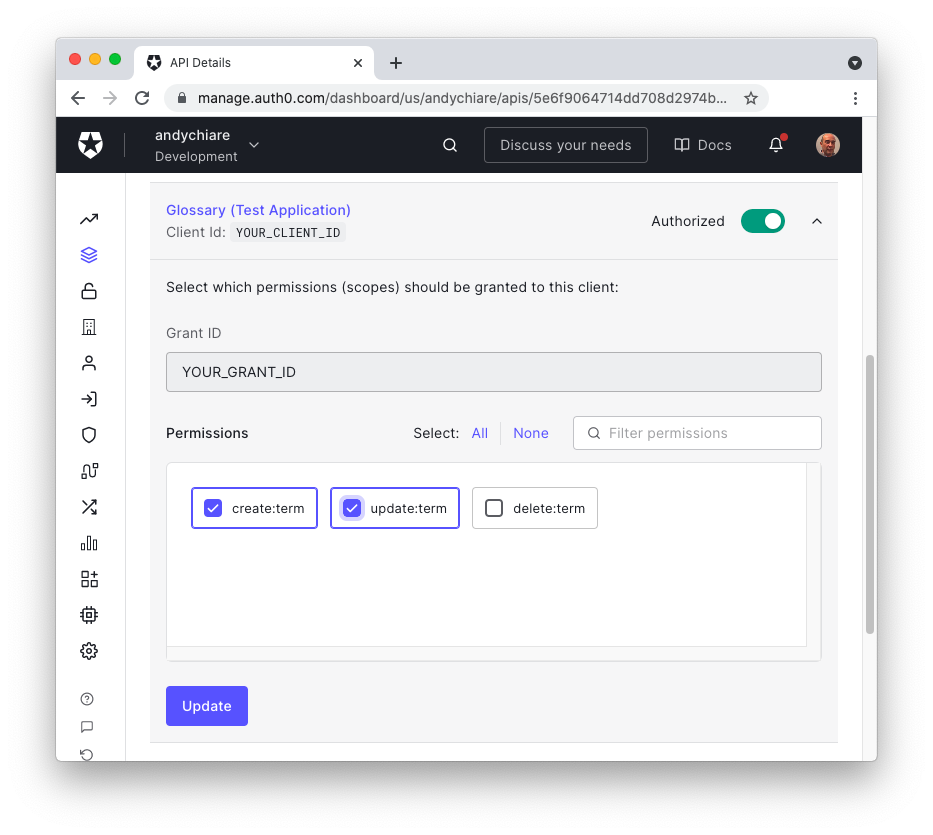
Back in your API configuration page on the Auth0 Dashboard, select the Machine to Machine Applications tab. You'll get a list of applications, some of them with the (Test Application) label in the name. These applications are automatically created by Auth0 when you create an API there. They are meant as test clients from your API. One of them should have the Authorized switch on. Click the dropdown next to it and check the create:term and update:term permissions in the section that will be shown:
Then, click the Update button, move again to the Test tab, and copy the new token that has been generated for you. Now, in the Swagger UI of your Web API, click the Authorize button again. This time the following window should appear:
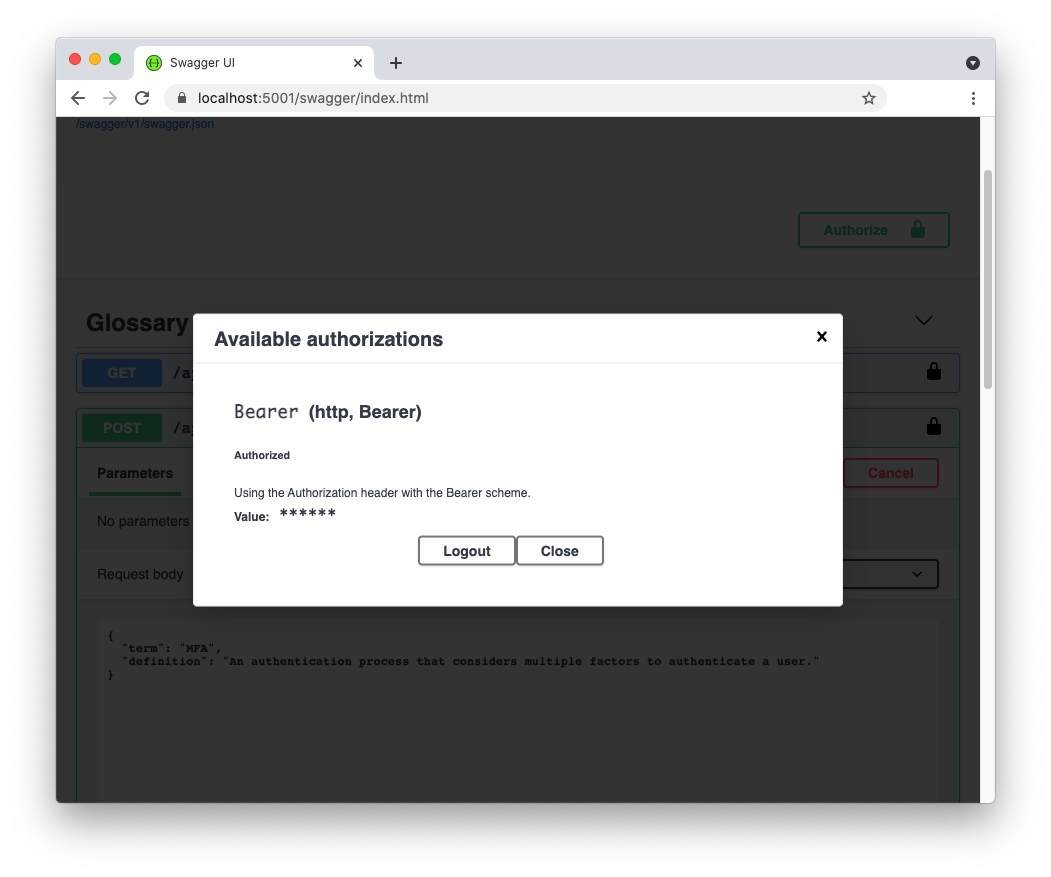
Click the Logout button and paste the new access token in the text box that appears.
At this point, try again to add a new term to the glossary through the POST action. Now you should get a successful response from the server.
If you decode your new access token in jwt.io, you should see that the permissions claim now contains the two permissions you assigned:

If you attempt to delete the newly created term with the same access token, you get the 403 Forbidden status code as before. In fact, your access token doesn't contain the deleting permission.
Testing access with deleting permissions
To be authorized to delete a glossary term, you need to grant the deleting permission to the test application. So, go back to the Machine to Machine Application tab of your API configuration on the Auth0 Dashboard and open the permissions section of the test application again. Check also the delete:term permission and click the Update button. Now, in the Test tab, copy the new access token and head back to your browser.
In the Swagger UI of your Web API, replace your current access token with the new one by using the Authorize button. Then, delete the glossary term you added earlier by using the DELETE action. This time your attempt should be successful!
Recap
In summary, you learned that permissions give you more granular control over access to your Web API. You discovered how to define permissions associated with your API in Auth0 and how to define and register authorization policies in your ASP.NET application. You saw that checking permissions in your API controller is a matter of adding a parameter to the Authorize attribute. You used your test client application on the Auth0 Dashboard to generate access tokens with the required permissions. Finally, you used the Swagger UI to test your Web API with access tokens having different permissions.
You can download the final code of the sample application from this GitHub repository.


