

You probably already read about asynchronous programming. async and await words are used everywhere, no matter which programming language we choose. Talking about .NET framework, and C# in particular, we have some native functions, classes, and reserved words that we can use to implement asynchronous tasks and workflows in our projects.
In this article, we will talk about synchronism, parallelism, concurrency, and how to implement asynchronous algorithms in our C# applications.
Synchronous and Asynchronous Tasks
As a developer, you surely faced scenarios where certain actions or operations took a considerable amount of time to execute. We regularly have to do long-running tasks such as reading a file, calling an API, or downloading a big file. We could wait for one of these tasks to be finished before executing another task. If that's the case, we say we are working in a "synchronous" way. By doing this, the whole application gets blocked and stops responding until the whole task is completed, and we can move on to a new one.
In some cases, we don't have any alternative. If we have Task1 and Task2 that depend on the result of the first action, we will have to wait until Task1 finishes executing to start Task2. But we could have the scenario where the subsequent tasks (or some of them) don't depend on the result of the previous long-running task. If that's the case, we have different strategies and approaches that we could take to make our application faster and in a more performant way.
For example, we could have an application that runs concurrent tasks internally. There is a button and a task executed when it is clicked. Right after the user clicks on the button, the application can trigger a separate thread to run the requested task. In the meantime, the main thread becomes available to execute other actions while the button's task is executed in the background. Doing this, we keep the UI responsive in case the user wants to interact with it.
Another scenario would be needing to run multiple copies of a certain group of actions or instructions. An example of this would be uploading many files at the same time. In this case, our application could trigger one thread per file and execute the necessary code inside of them. Doing this, we would be processing the files in a "parallel" way. In a nutshell, here is the difference between the two concepts: concurrency means the application is making progress on more than one task at the same time, while parallelism is about running multiple tasks simultaneously.
But let's say we have to read a big file, call an API, and do some complex calculations. There is no dependency between the three tasks, but we need the result of all of them to continue the execution of our application and update the UI. In this case, we could execute our tasks "asynchronously" with the three ones running simultaneously and wait for their result to do the subsequent tasks.
What Is Asynchronous Programming?
We could define asynchronous programming as the way of executing programming code in a thread without having to wait for an I/O-bound or CPU-bound task to finish. I/O-bound operations could be file-system accesses, HTTP requests, API calls, or database queries. And CPU-bound operations would be actions like encrypting data, complex calculations, image or document management.
One of the ideas of asynchronous programming is to divide our logic into awaitable tasks so that we don't block the execution of our application. We can call an async method and get a task object that represents it. In the meantime, we can do some not related and not dependant work. After we execute those operations, we await the async task, which may already be finished or not. If the execution is finished, we will get the resulting value from the task and use it in the next dependant operations.
Benefits
Some of the benefits we have working with asynchronous tasks are:
- We keep the UI of our app responsive.
- We improve the performance of our application.
- We avoid thread pool starvation.
Drawbacks
Although, there are some drawbacks when working with async programming:
- Code gets more complex and harder to maintain.
- There is increased memory allocation, as some objects have to stay alive longer while awaiting other code to be executed.
- It can get hard to find bugs occurring in asynchronous tasks.
- When we're writing an asynchronous piece of code, all our application code tends to become asynchronous.
Asynchronous Programming Patterns
To perform asynchronous operations in .NET, we can follow three different patterns:
Asynchronous Programming Model (APM): Let's say we have two methods, and we name them BeginOperation and EndOperation. After calling BeginOperation, our application can continue executing tasks on the calling thread while the async task is executed on a different thread. For each call to BeginOperation, our app should also call EndOperation method to get the results. In .NET, it can be implemented using IAsyncResult. Let's see an example of this model:
using System;
using System.IO;
using System.Threading;
public sealed class Program
{
    public static void Main()
    {
        var buffer = new byte[100];
        var fs = new FileStream("bigFile.txt", FileMode.Open, FileAccess.Read, FileShare.Read, 1024, FileOptions.Asynchronous);

        IAsyncResult result = fs.BeginRead(buffer, 0, buffer.Length, null, null);

        // Do other things...

        int numBytes = fs.EndRead(result);
        fs.Close();

        Console.WriteLine("Read {0}  Bytes:", numBytes);
    }
}
Event-based Asynchronous Pattern (EAP): We start an async method that will trigger a Completed event when the task is completed, making the result available to our application. This would be an example of this model:
public class ExampleHandler
{
    public event EventHandler OnTriggerCompleted;

    public void Start(int timeout)
    {
        var timer = new Timer(new TimerCallback((state) =>
        {
            OnTriggerCompleted?.Invoke(null, null);
        }));

        timer.Change(timeout, 0);
    }
}

class Program
{
    private static void Main()
    {
        var handler = new ExampleHandler();

        handler.OnTriggerCompleted += (sender, e) =>
        {
            Console.WriteLine($"Triggered at: { DateTime.Now.ToLongTimeString()}");
        };

        handler.Start(3000);

        Console.WriteLine($"Start waiting at {DateTime.Now.ToLongTimeString()}");
        Console.WriteLine($"Processing...");
        Console.ReadLine();
    }
}
Task-based Asynchronous Pattern (TAP): We have an OperationAsync method that returns a Task object, as in the following example:
class ClassName
{
    public Task OperationAsync(byte [] buffer, int offset, int count);
}
We can await that method, using async and await keywords. We will go deeper into this approach in a while.
Keep in mind that the APM and EAP approaches are legacy models and they are no longer recommended. Microsoft recommends using the Task-based Asynchronous Pattern to implement async programming in our applications.
Asynchronous Programming in C#
As we mentioned, async programming in C# can be accomplished by implementing the Task-based Asynchronous Pattern. We will have methods that return a Task or Task<T> object. Defining those methods as async operations will enable us to await them and keep using the same execution thread to run other operations that are not linked to the awaited task.
C# provides us two keywords to handle Task objects in an easier way: async and await. Adding the keyword async to a method signature allows us to use the await keyword inside the method while instructs the compiler to create a state machine to handle the asynchronicity. On the other hand, the await keyword is used to pause the execution of a method and asynchronously wait for a Task to finish, while the current thread is sent back to the thread pool instead of keeping it in a blocked state. Everything happens in the background, avoiding us to implement and maintain the complexity of thread management and the state of the calls.
Let's analyze this piece of code:
public async Task<User> GetLoggedUserEmailAsync()
{
  int userId = GetId();
  string email = await GetEmailAsync(userId);
  User user = GetUserByEmail(email);
  return user;
}

public async Task<string> GetEmailAsync(int userId)
{
  // Do something
}
An async method should return void, Task, or Task<T>, where T is the return data type that we need. Returning void is normally used for event handlers. The keyword async enables us to use the command await within the method so that we can wait for the asynchronous method processing as expected.
Notice that the methods end with "Async". Although it is not mandatory, there is a naming convention that an asynchronous method name should end with the word "Async". This convention aims to make it clear to the consumer of the functionality that the method won't complete all of its work synchronously.
In our previous example, GetId() is called synchronously. When the execution thread encounters the await keyword on await GetEmailAsync(userId), it creates a Task<User> that contains the remainder of the GetLoggedUserEmailAsync method. This task is executed asynchronously after the Task<string> returned by GetEmailAsync. So, the User object is returned from the Task<User> created by the await keyword.
Asynchronous Code in Action
Let's see a short example to review the concepts previously explained. Having the following console application:
using System;
using System.IO;
using System.Threading.Tasks;
class Program
{
static async Task Main(string[] args)
{
string filePath = "bigFile.txt";
// Create a big file
FileStream fs = new FileStream(filePath, FileMode.CreateNew);
fs.Seek(1024 * 1024, SeekOrigin.Begin);
fs.WriteByte(0);
fs.Close();
var task = ReadFileAsync(filePath);
Console.WriteLine("A synchronous message");
int length = await task;
Console.WriteLine("Total file length: " + length);
Console.WriteLine("After reading message");
Console.ReadLine();
}
static async Task<int> ReadFileAsync(string file)
{
Console.WriteLine("Start reading file");
int length = 0;
using(StreamReader reader = new StreamReader(file))
{
string fileContent = await reader.ReadToEndAsync();
length = fileContent.Length;
}
Console.WriteLine("Finished reading file");
return length;
}
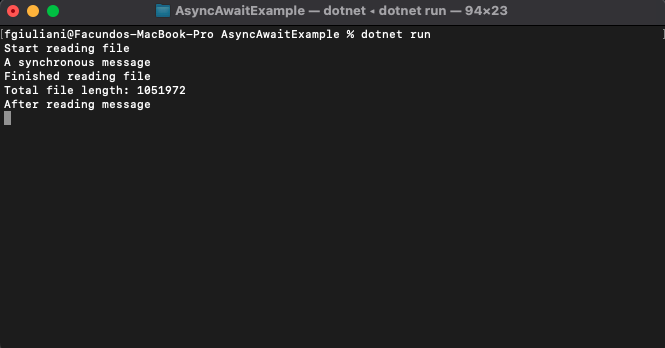
}In this application, we read a big file, count the number of characters it has, and print different messages in the console. The method that triggers the file reading operation is defined as asynchronous, and it's the one that starts the asynchronous thread reading the text. While the message "A synchronous message" is printed, the reading of the file continues. If we execute the application, we can see how the execution thread behaves based on the output messages:
Summary
In this article, we talked about how we can manage and organize the tasks in our application based on the dependency and order of execution. We talked about synchronism, parallelism, concurrency, and asynchronism. We described async programming, its benefits, and how we can implement it in our C# applications. You can find the code shown in this article in this GitHub repository.
If you want to learn more about asynchronous programming in C# and what advanced features we have available, you can go to:
- Async in depth by Microsoft.
- Asynchronous programming with async and await by Microsoft.
- Asynchronous Programming Guidance by David Fowler.
- Async/Await - Best Practices in Asynchronous Programming by Microsoft.
Aside: Securing ASP.NET Core with Auth0
Securing ASP.NET Core applications with Auth0 is easy and brings a lot of great features to the table. With Auth0, you only have to write a few lines of code to get a solid identity management solution, single sign-on, support for social identity providers (like Facebook, GitHub, Twitter, etc.), and support for enterprise identity providers (like Active Directory, LDAP, SAML, custom, etc.).
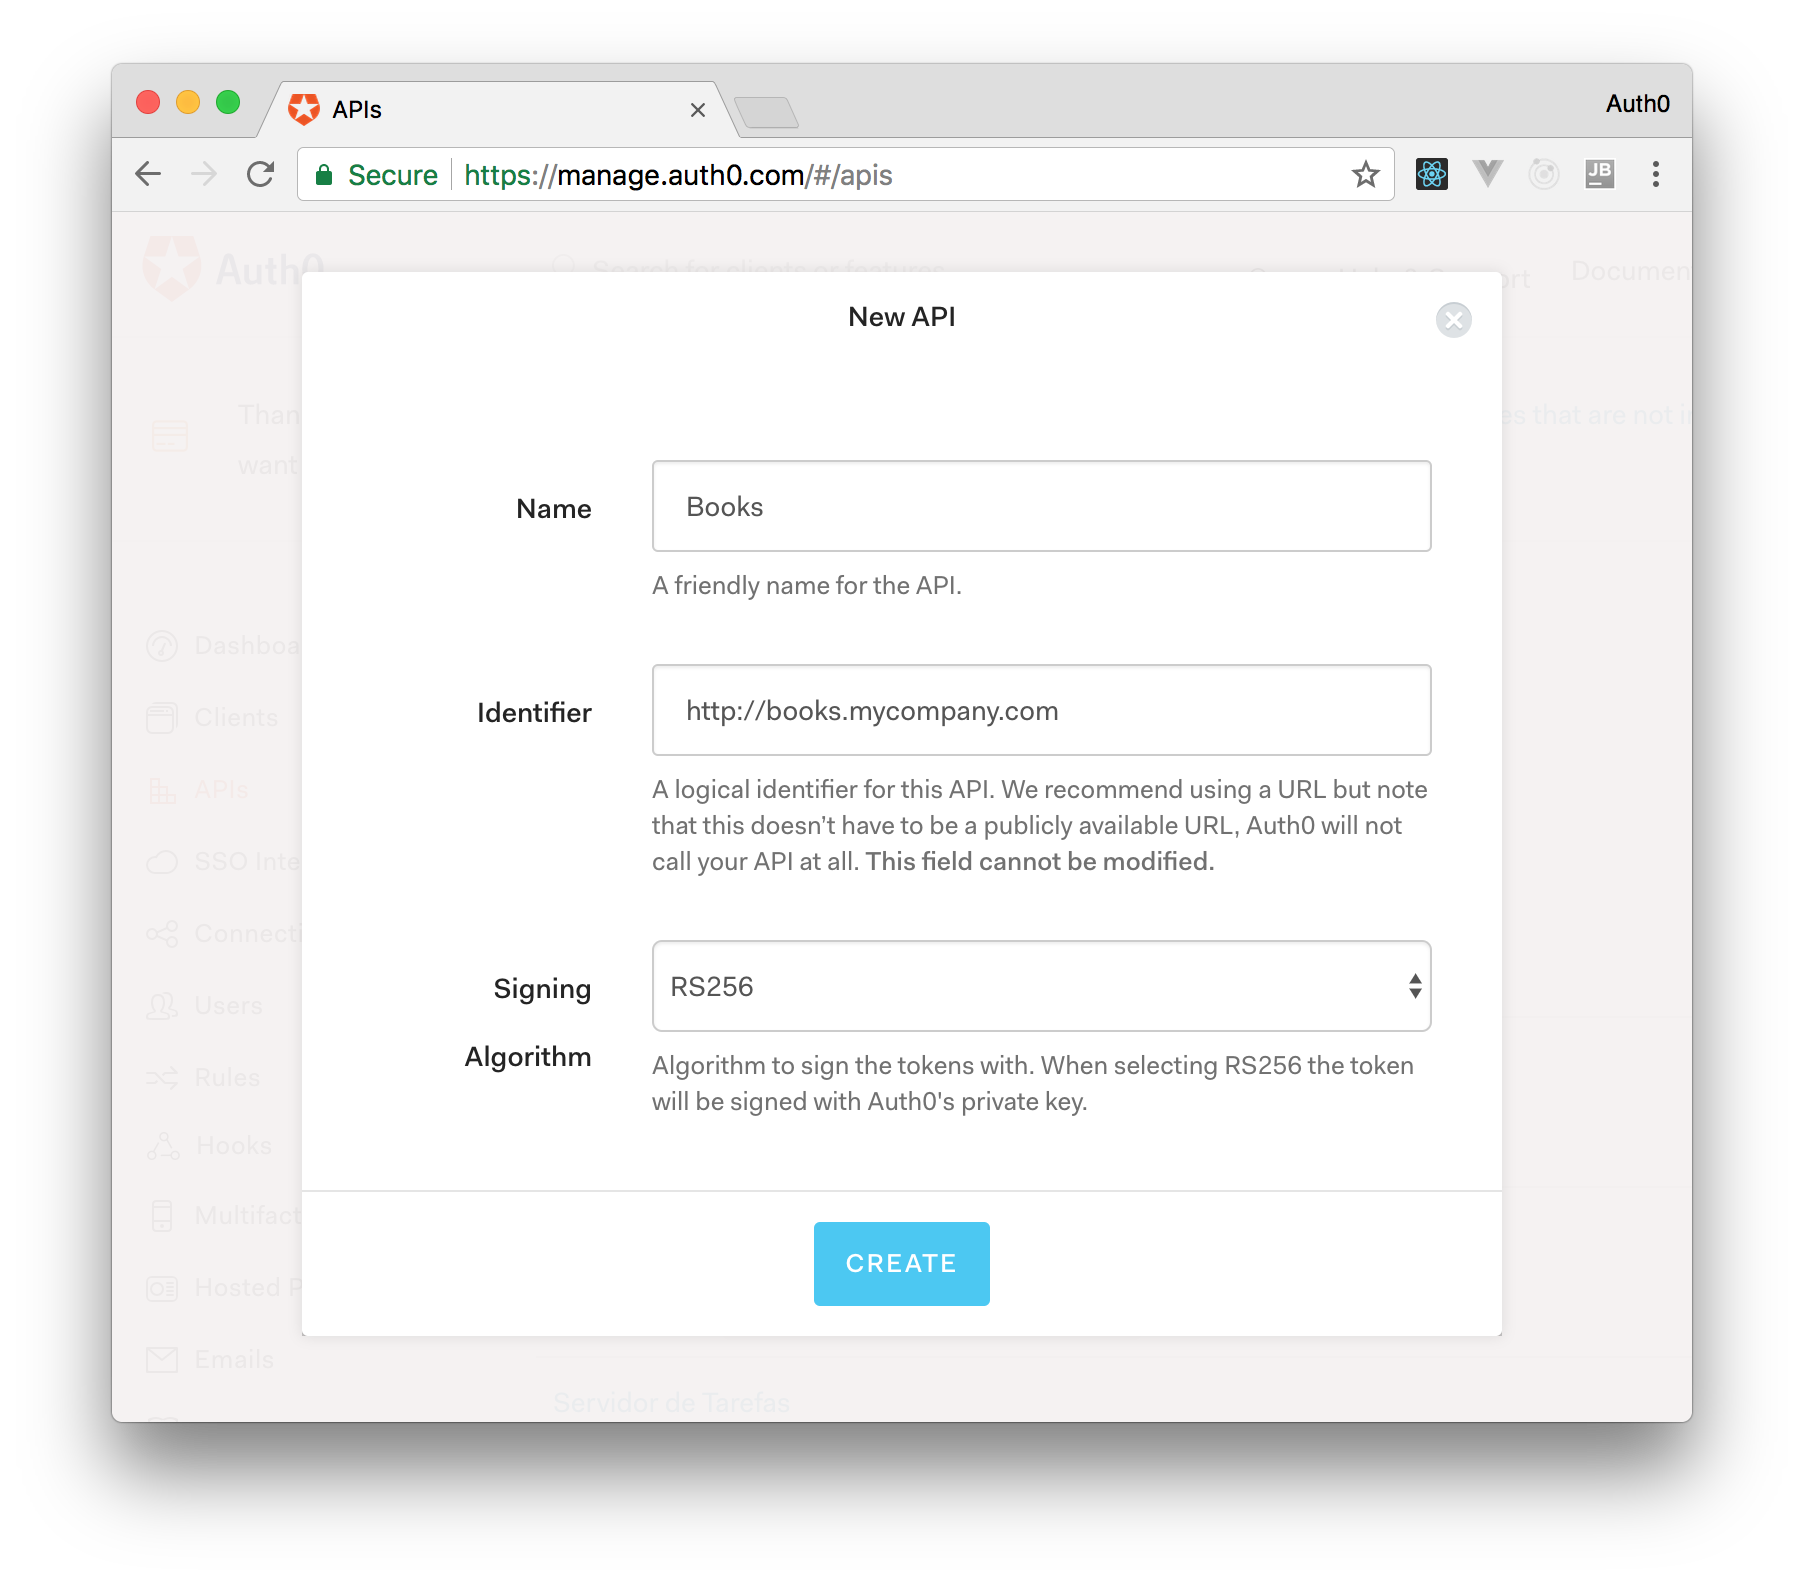
On ASP.NET Core, you need to create an API in your Auth0 Management Dashboard and change a few things on your code. To create an API, you need to sign up for a free Auth0 account. After that, you need to go to the API section of the dashboard and click on "Create API". On the dialog shown, you can set the Name of your API as "Books", the Identifier as "http://books.mycompany.com", and leave the Signing Algorithm as "RS256".
After that, you have to add the call to services.AddAuthentication() in the ConfigureServices() method of the Startup class as follows:
string authority = $"https://{Configuration["Auth0:Domain"]}/";
string audience = Configuration["Auth0:Audience"];

services.AddAuthentication(options =>
{
  options.DefaultAuthenticateScheme = JwtBearerDefaults.AuthenticationScheme;
  options.DefaultChallengeScheme = JwtBearerDefaults.AuthenticationScheme;
}).AddJwtBearer(options =>
{
  options.Authority = authority;
  options.Audience = audience;
});
In the body of the Configure() method of the Startup class, you also need to add an invocation to app.UseAuthentication() and app.UseAuthorization() as shown below:
app.UseRouting();
app.UseAuthentication();
app.UseAuthorization();
app.UseEndpoints(endpoints =>
{
    endpoints.MapControllers();
});
Make sure you invoke these methods in the order shown above. It is essential so that everything works properly.
Finally, add the following element to the appsettings.json configuration file:
{
  "Logging": {
    // ...
  },
  "Auth0": {
    "Domain": "YOUR_DOMAIN",
    "Audience": "YOUR_AUDIENCE"
  }
}Note: Replace the placeholders
YOUR_DOMAINandYOUR_AUDIENCEwith the actual values for the domain that you specified when creating your Auth0 account and the Identifier you assigned to your API.


