Styling Apps with CSS in .NET MAUI

Though Cascading Style Sheets are often used to style webpages, we can now use CSS to theme our .NET MAUI mobile and desktop apps. Let’s learn how!
Applying styles to our applications helps us save code by allowing us to reuse different properties in one or more than one visual element without the need to repeat it. It also allows us to better maintain the visual identity (or branding) of our apps. In .NET MAUI, we can apply these styles with XAML, and also with CSS!
In this article we will go through all the necessary steps for you to learn how to add styles with CSS to your .NET MAUI applications!
What Is CSS?
Before going into the material, let’s refresh with some important points.
Cascading Style Sheets (CSS) allow you to define multiple visual properties of interface elements in a reusable way. CSS is a language used for the composition and structuring of webpages. It is a list of rules to define the styles of your application, generally used for web applications, but today we will learn how to integrate CSS into mobile and desktop applications with .NET MAUI.
Table of Contents
The explanation of this article will be based on the following topic structure:
- Consuming a style sheet
- Loading a style sheet (with XAML and C#)
- Understanding child style sheet behavior
- What are selectors?
- Exploring selectors types
- Property reference, .NET MAUI specific properties and .NET MAUI Shell specific properties
Let’s see each one of them in detail.
🗒 Consuming a Style Sheet
The first thing you should have at hand is your .NET MAUI application (you can create a new one or use an existing one). Then apply the following instructions:
Step 1: Create Your CSS File in the Resources Folder
Go to Resources ➡ Styles folder and inside this one, create your .css file. (For this example, my file will be called StyleCSS.css.)
📋 You can add it to any other folder. However, to maintain a better organization and structure, Resources ➡ Styles is recommended.
^contentpage {
  background-color: lightpink;
}

stacklayout {
  -maui-spacing: 6;
  margin: 40;
}

grid {
  row-gap: 6;
  column-gap: 6;
}

stacklayout>image {
  height: 200;
  width: 200;
}
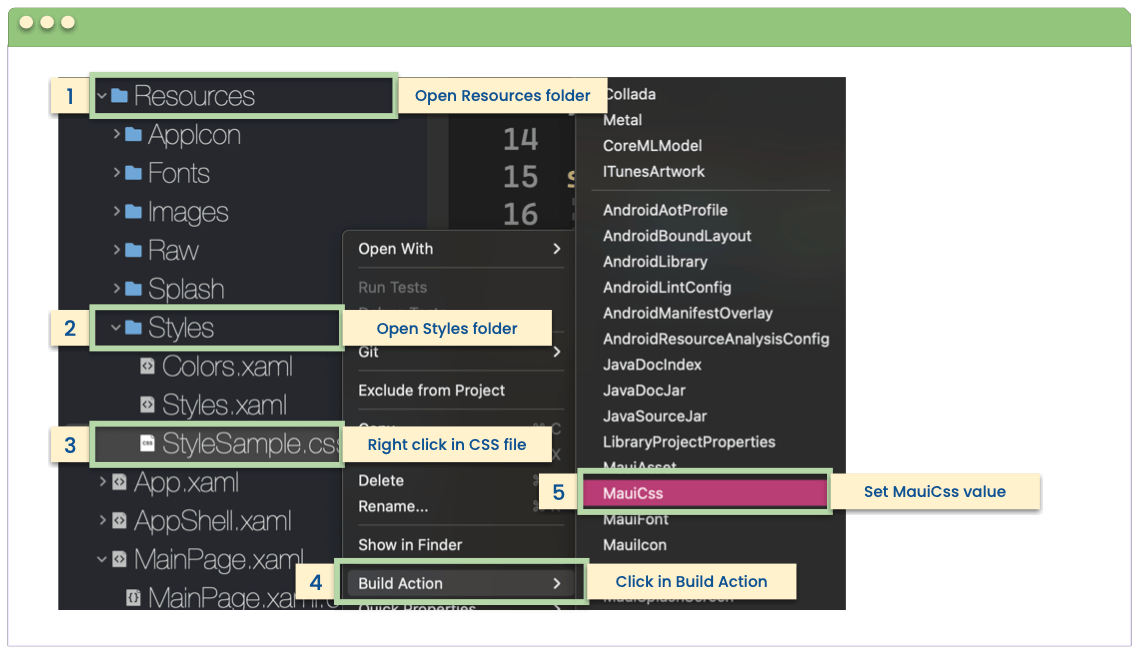
Step 2: Set the Build Action to the CSS File
Go to Resources ➡ Styles ➡ Your CSS File-➡ Right Click ➡ Build Action ➡ MauiCSS. As you will see below:

❗ The CSS file will fail to load if its Build Action is not set to MauiCss.
📒 Loading a Style Sheet in XAML
Once you have done the previous step, now we are going to load this CSS sheet in our app as follows:
Add the StyleSheet Class
Let’s add the StyleSheet class which allows us to load and parse the style sheet. Go to your SamplePage.xaml file and inside the <ContentPage.Resources> tags, add the following:
<ContentPage.Resources>
   <StyleSheet Source="Resources/Styles/StyleCSS.css" />
</ContentPage.Resources>
📃 Remember that “StyleCSS.css” is the name of my CSS file sample. If yours has another name, you must replace it.
Another option to do it is adding a CDATA section:
<ContentPage ...>
   <ContentPage.Resources>
    <StyleSheet>
     <![CDATA[
     ^contentpage {
       background-color: lightpink;
       }
      ]]>
    </StyleSheet>
  </ContentPage.Resources>
...
</ContentPage>
📒 Loading a Style Sheet in C#
A CSS document can be loaded from a StringReader to later be added to a ResourceDictionary:
using Microsoft.Maui.Controls.StyleSheets;
public partial class MyPage : ContentPage
{
  public MyPage()
  {
    InitializeComponent();
    using (var reader = new StringReader("^contentpage { background-color: lightpink; }"))
    {
     this.Resources.Add(StyleSheet.FromReader(reader));
    }
   }
}
Understanding Child Style Sheet Behavior
Child style sheets override parent style sheets if the same properties are set.
Therefore, for the occasions in which properties are repeated, the following precedence rules are followed:
- A style defined in the application resources will be overridden by a style defined in the page resources.
- A style defined in page resources will be overwritten by a style defined in the control resources.
- A style defined in the app resources will be overwritten by a style defined in the control resources.
What Are Selector Elements?
Selectors are responsible for determining the element to which the style will be applied. To be able to apply the styles, it’s a priority to know the selectors in CSS. You can use the same selectors as CSS in .NET MAUI!
Exploring Selector Types
There are different selector types. Below we will see their definitions and examples of each one:
Tag or Type Selectors
These allow you to indicate the name or the tag to which the CSS properties will be assigned.
Let’s see an example:
This example selects all elements of type StackLayout and sets the Margin property to 50 as its value.

⚠ The element selector does not identify subclasses of the specified type.
Base Class Selectors
These allow you to indicate the elements in the visual tree that can be selected by base class with ^base selector.
Let’s see an example:
This example is selecting all elements with ContentPage as the base class (including ContentPage itself) and sets it to a Green background color.

Important to keep in mind:
- It does not distinguish between upper and lower case.
- The
^baseselector is specific to .NET MAUI and is not part of the CSS specification.
ID or Name Selectors
These allow you to select an element by its ID or name. Identifies the element whose StyleId property is set to an element. In case the StyleId property is not established, it will take the data from the x:Name property of the element.
Let’s see an example:
Imagine you already have a button named SendButton.
<Button x:Name="SendButton"
  Text="Send"
  Background="Pink"/>
Now, let’s continue with the CSS styling:
A blue background was added to elements with the id #SendButton.

Class Selectors
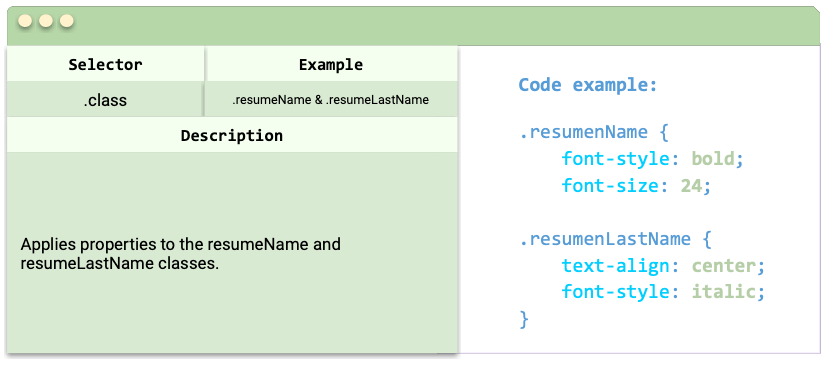
These allow you to select an element by class name. A CSS class can be assigned to a XAML element by setting the element’s StyleClass property to the name of the CSS class.
Let’s see an example:
Imagine you already have two Buttons with some assigned classes:
<Button StyleClass="resumenName" />
<Button StyleClass="resumenLastName" />
Now, let’s continue with the CSS styling:
Here we apply different properties to the resumeName and resumeLastName classes which are contained in two buttons.

Child Element Selectors
These allow selecting the child elements in the visual tree.
Let’s see an example:
Imagine you already have an image inside a StackLayout:
<StackLayout>
   <Image Source="dotnet_bot"/
</StackLayout>
Now, let’s continue with the CSS styling:
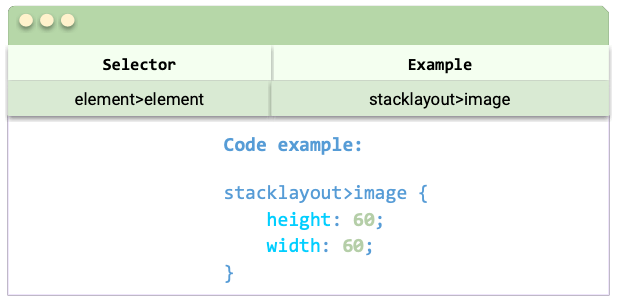
The example sets the height and width of the images within the StackLayouts.

The selected element does not have to be direct—it can be secondary. It may happen that the element is an ancestor.
In case you only want to refer to the direct element, you can do it using the “>” sign, as follows:

Other Types of Selectors
- Element + Element: It allows you to indicate the direct elements that you want to select after an indicated main one. In this case the example selects all the Entry directly after the Label.

- Element ~ Element: It allows you to indicate the preceded elements that you want to select before an indicated one. In this case the example selects all Entry elements preceded by a Label.

📋 Selectors can be combined without limitation. For example:
StackLayout>ContentView>label.email.
📝 Property Reference
The following CSS properties are supported by .NET MAUI:
| 🔧 Property | 📏 Applies to |
|---|---|
| FlexLayout |
| VisualElement |
| Page |
| Button, Frame, ImageButton |
| BoxView, Button, Frame, ImageButton |
| Button, ImageButton |
| ActivityIndicator, BoxView, Button, CheckBox, DatePicker, Editor, Entry, Label, Picker, ProgressBar, SearchBar, Switch, TimePicker |
| Grid |
| Button, DatePicker, Editor, Entry, Label, Picker, SearchBar, TimePicker, Span |
| Button, DatePicker, Editor, Entry, Label, Picker, SearchBar, SearchHandler, Span, TimePicker |
| Label, Span |
| View |
| Label |
| Button, ImageButton, Layout, Page |
| Entry, EntryCell, Label, SearchBar |
📝 .NET MAUI Specific Properties
The following .NET MAUI specific CSS properties are also supported:
| 🔧 Property | 📏 Applies to |
|---|---|
| NavigationPage, TabbedPage |
| ScrollView |
| Entry, Editor, SearchBar |
| Slider |
| ScrollView, StackLayout |
| StackLayout |
| Slider, Switch |
| Label |
| VisualElement |
📝 .NET MAUI Shell Specific Properties
The following .NET MAUI Shell specific CSS properties are also supported:
| 🔧 Property | 📏 Applies to |
|---|---|
| Shell |
| Element |
🚫 Limitations
- CSS variables are unsupported.
- CSS sheets are parsed at runtime, not at compile time.
- The following CSS selectors are unsupported:
◦ [attribute]
◦ @media and @supports
◦ and :: - It’s not possible to style our applications 100% with CSS, so we can use XAML to complement.
- It is not possible to change one style sheet at runtime for another.
Wrapping up
And done! 😎 In this article you have learned all the necessary information so that you can start adding styling to your .NET MAUI applications with CSS!
Thanks for reading this article! 💚💕
See you next time! 🙋♀️
References: https://learn.microsoft.com/en-us/dotnet/maui/user-interface/styles/css?view=net-maui-7.0
Use a component library in sync with .NET MAUI’s release cadence. Try Telerik UI for .NET MAUI for free.

Leomaris Reyes
Leomaris Reyes is a Software Engineer from the Dominican Republic, with more than 5 years of experience. A Xamarin Certified Mobile Developer, she is also the founder of Stemelle, an entity that works with software developers, training and mentoring with a main goal of including women in Tech. Leomaris really loves learning new things! 💚💕 You can follow her: Twitter, LinkedIn , AskXammy and Medium.

